Configure Microsoft Entra ID for OIDC SSO
Introduction
Microsoft Entra ID (formerly Azure Active Directory) is a Cloud based Identity and Access Management that can be used for OIDC Single Sign-On (SSO) with the CIS SecureSuite Platform.
This guide explains how CIS SecureSuite Platform System Admins can configure Entra ID as their organization's identity provider for OIDC SSO.
Prerequisites
Ensure the following prerequisites have been met before proceeding.
| Item | Requirement |
|---|---|
| Entra ID role | Cloud Application Administrator or Application Administrator in target tenant |
| CIS SecureSuite Platform role | System Admin role |
| Secret storage | A password manager or vault ready to store the client secret immediately |
| Admin consent rights | If your tenant requires admin consent for API permissions, confirm you can grant it or have a Global Admin available |
Steps
1. Register and Configure the application.
2. Create a client secret.
3. Configure API permissions.
4. Assign users and groups.
5. Collect credentials and endpoints.
6. Connect Entra ID Application to the CIS SecureSuite Platform.
Tip
We recommend opening the CIS SecureSuite Platform and going to the IdP page in Admin. You will need to copy/paste values from the IdP to the CIS SecureSuite Platform and vice versa.
Register and Configure the Application
Start by registering and configuring the application in Entra ID.
1. Log in to your Entra ID account.
2. Go to EntraID > App registrations > New registration.
3. Complete the form as follows:
- Name: Enter a clear, descriptive name—e.g., CIS SecureSuite
- Supported account types: Select Accounts in this organizational directory only (single-tenant).
Note
Do not select multi-tenant unless required.
- Supported account types: Select Accounts in this organizational directory only (single-tenant).
- Redirect URI - Platform: Select Web (server-side application)
- Redirect URI - Value: Copy and paste the Sign-in Redirect URI value from the CIS SecureSuite Platform.
Note
The Redirect URI must exactly match what the CIS SecureSuite Platform shows— character for character, including protocol (https) and any path suffix. A mismatch causes a redirect_uri_mismatch error at login.

4. Select Register.
Create a Client Secret
The CIS SecureSuite Platform uses the Authorization Code flow with a client secret. Create a client secret immediately after registration.
1. In the left panel of your new App Registration, select Certificates & secrets.
2. Select New client secret.
3. Enter a description (e.g., CIS SecureSuite OIDC) and select an expiration period that aligns with your team's secret rotation policy.
4. Select Add.

5. Copy the Value column immediately as is displayed only once and paste it into your team's vault.
Warning
Do not navigate away before copying the client secret. If you lose it, you must generate a new one and update CIS SecureSuite immediately. Set a calendar reminder before the expiration date to rotate it proactively. If you lose your secret or it expires, you can come back into Entra ID and generate a new one.
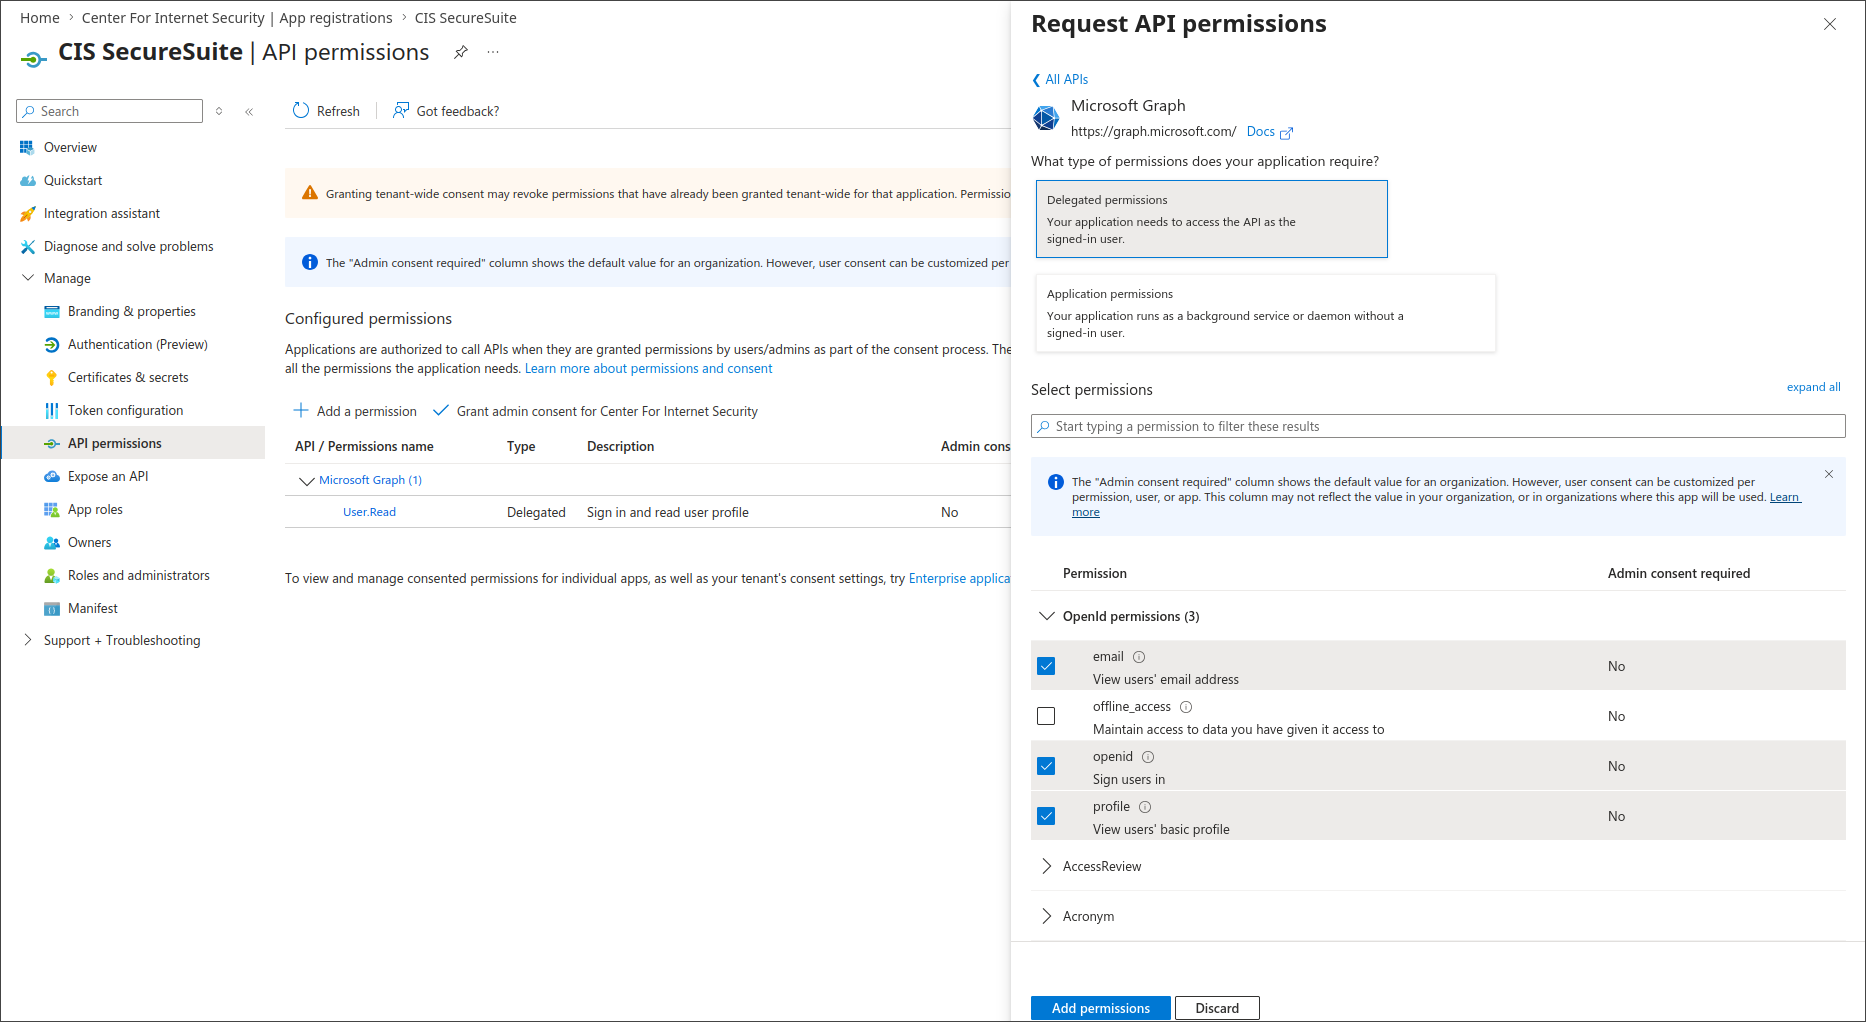
Configure API Permissions
CIS SecureSuite requires standard OIDC scopes to receive user identity information. Verify the required API permissions are present; if not, add them.
1. Go to API permissions.
2. Confirm User.Read (Microsoft Graph, Delegated) is already present (usually added by default).
3. Select Add a permission > Microsoft Graph > Delegated permissions.
4. Search for and add the following permissions if not listed:
| Permission | Description |
|---|---|
| openid | Required for OIDC authentication |
| profile | Provides name and username claims |
| Provides the user's email address |
5. Select Add permissions.
Admin consent
The openid, profile, and email scopes are low-privilege delegated permissions and typically do not require elevated admin consent. If your Entra tenant policy restricts user consent, select Grant admin consent for [your tenant] and confirm. A green checkmark should appear next to each permission.
Assign Users and Groups
Assign the users and groups that require access to the CIS SecureSuite Platform.
Check Assignment Requirement Setting
Even with OIDC configured, Entra ID can restrict which users may sign in to an application. Confirm the assignment behavior is appropriate for your org.
1. Go to Entra ID > Enterprise applications and select your CIS SecureSuite Platform application.
2. Go to Manage > Properties.
3. Set the Assignment required? to Yes.
Assignment requirements
If this option is set to yes, then users and other apps or services must first be assigned this application before being able to access it. If this option is set to no, then all users will be able to sign in, and other apps and services will be able to obtain an access token to this service.
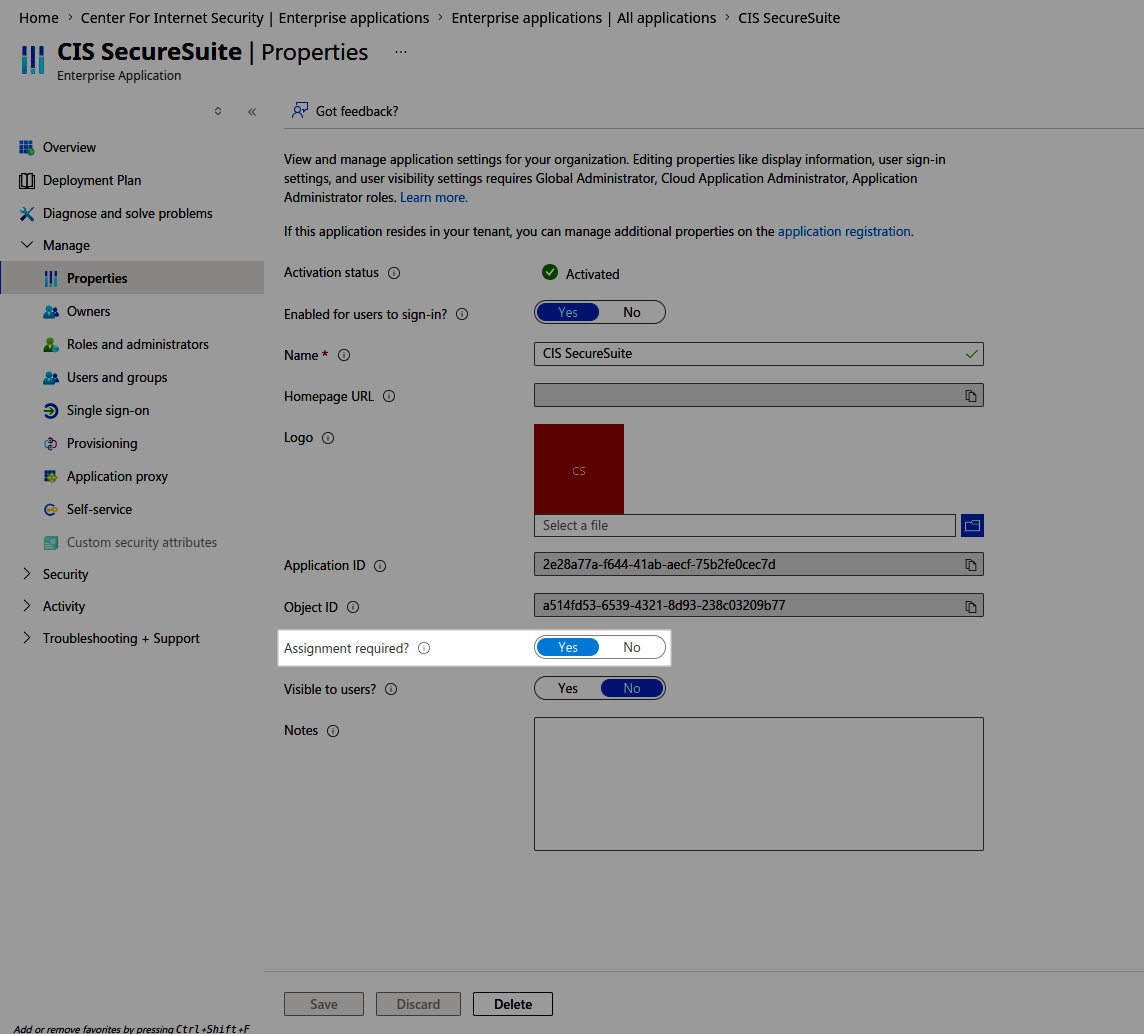
4. Select Save.
Assign Users or Groups
1. From the left panel, select Users and groups.
2. Select Add user/group.
3. Search for and select the group(s) whose members should have access to the CIS SecureSuite Platform.
4. Select Assign.
Note
Assign groups rather than individuals whenever possible. This keeps access aligned with your existing joiners/movers/leavers process in Entra ID.
Collect Credentials and Endpoints
With app registration complete, collect the values needed for the CIS SecureSuite Platform.
1. Navigate back to the app registration.
2. Copy the Application (client) ID value.
3. Select Endpoints from the top toolbar and copy the OpenID Connect metadata document URL. This URL will be used as the discovery endpoint when connecting the EntraID application to the CIS SecureSuite Platform.
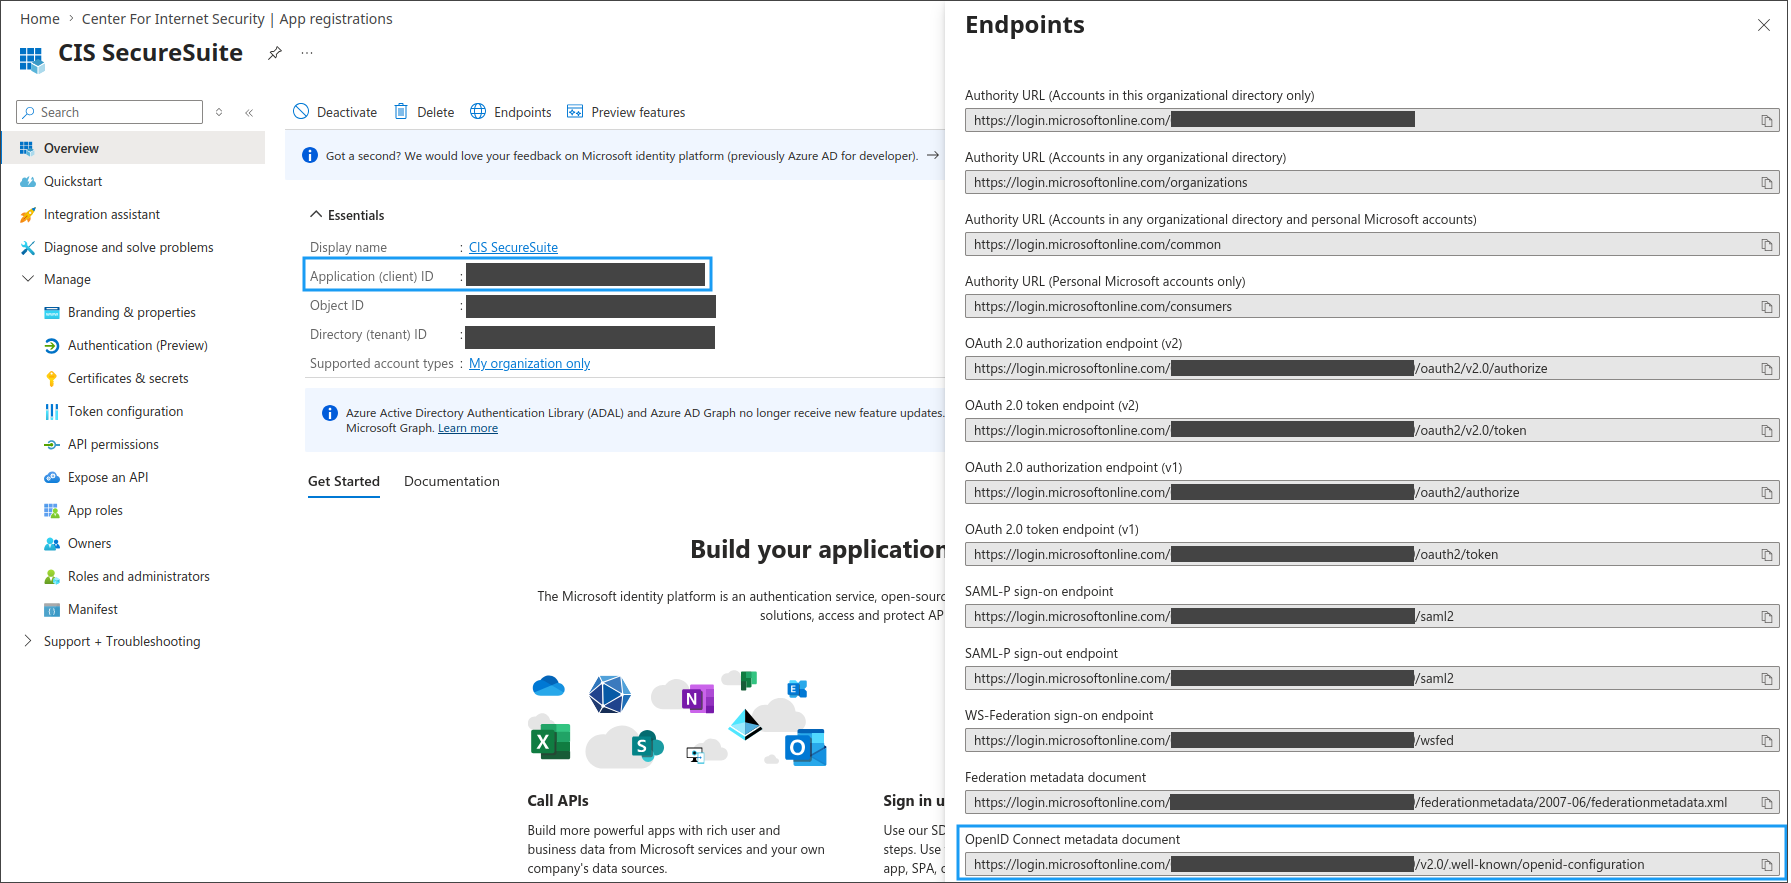
Field labels
Field labels between Entra ID and the CIS SecureSuite Platform may not match exactly (e.g., Application (client) ID vs. Client ID). They refer to the same value. If your CIS version shows separate fields for endpoints rather than a discovery URL, use the values from the Entra Endpoints dialog.
Connect Entra ID Application to the CIS SecureSuite Platform
Finish setting up SSO with Entra ID by connecting the IdP to the CIS SecureSuite Platform.
1. Open the CIS SecureSuite Platform.
2. Go to Admin > IdP.
3. From the External Identity Provider dropdown, select OIDC.
4. Complete the fields by providing the discovery URL, client ID, and client secret.
Tip
Refer to the Connect with OIDC procedure for detailed instructions on this step.
5. Select Submit to establish the connection.